A Step-By-Step Guide To Spring Cleaning Your Kitchen Pantry

If you’re anything like us, you’re in full spring cleaning mode. This month, we’re bringing you a series of posts on how to tidy up everything in your life, from your finances to your wardrobe. This week, we show you how to finally organize that woefully forgotten room in your home: the pantry.
When I was searching for my first home, a lot of the selling points came down to the rooms where I’d be spending the majority of my time. For instance, the kitchen would have to be open, the laundry room would need to be easily accessible, and the pantry would have to be big enough. Before owning, every rental unit I lived in had one cupboard for all of my dry goods and a fridge to split between two or three roommates. When we did a walkthrough of our new home and saw the walk-in pantry, the excitement was real.
Having this much space was a more significant challenge than I thought it would be. For the first six months of living in our home, we lost control of this vast space. It turned into a cluttered mess with a ton of stacked food that went unused and expired.
Eventually, I decided to spring clean my pantry. I planned to create a clean and organized space for my family to store food. For me, the goal was less food waste, easier meal prep, and a healthier collection of staple items that we would actually use. Here’s my step-by-step guide to achieving the perfect pantry.
Step 1: Deep clean and declutter
The first day I started this journey, I spent nearly two hours cleaning out all of the food items we had in our pantry. I needed to take everything out to fully grasp how much we had, what was expired, and what we were missing as far as pantry staples go. In our most recent move, we threw everything we had into boxes, put those items into our pantry and forgot about them. In the end, we had a lot of expired products.
We had to toss everything from baby food that my toddler will never eat again to the canned soup that we’d been lugging around for five years. It was frustrating for me to see because I am a big believer in avoiding food waste. But, it was also a good reminder of why we so badly needed a better system for our food.
Step 2: Look for inspiration
Once I knew what we had and finished the cleaning portion of the project, it was time to get inspired. If you’re a big Pinterest fan like me, you already know there are so many awesome ideas for pantry inspiration. In fact, it’s overwhelming. The cute shelf displays, expensive glass jars, and custom labels made me feel like I would have to spend a lot of money to get what I wanted.
Then, as I was doing my afternoon Instagram scrolling, I came across the inspiration I needed: Chrissy Teigen. I know, I can’t believe it either. She had just posted her newly organized pantry to Instagram, and I was in love. It was exactly what I wanted. So, using those photos as motivation, and a few pins on a board called “Future Home,” I had an obvious picture of what I would need to accomplish this goal.
Sometimes inspiration will appear without any of your own doing, but if it doesn’t, here are a few great resources to get you started: paperback or Kindle book Simply Clean, Instagram account neatmethod, or– a personal favorite – this Organized Bliss Pinterest board.
Step 3: Take inventory of supplies you need.
If I’ve learned anything in my attempt to transform my home into a space that Marie Kondo would be proud of, it’s that I tend to overbuy the things I need “just in case.” I didn’t want to make that mistake this time. Instead, I spent one afternoon writing down a list of all of the items I had in our pantry.
From there, I figured out which items I’d want in jars, and the number of containers I would need, as well as the different sizes. Before I bought any new storage options, I also checked around to see if I had anything at home first that might work. In a great stroke of luck, I had forgotten entirely about two free packages of containers that I’d received from large grocery purchases. Once I unboxed and washed those containers, I had a great start.
Step 4: Research and hunt for organization systems.
As soon as I knew what styles of containers I was looking for and how many I would need, I was on the hunt for affordable options. I spent scoured online container stores and Amazon for the perfect storage bins, but the prices all seemed to be a bit too steep for my liking.
Instead, I chose to go on an adventure to a few dollar stores around my city. After falling short of what I was looking for in the first location, the second dollar store was perfect. They had every single size and type of jar I wanted for a fraction of the cost I’d pay online.
Step 5: Buy only what you need.
First, I picked up a few of each style container and brought them home to see how they looked. My biggest fear would be to spend a ton of money and not like the outcome. When I moved food into the containers, I knew these containers were the right choice, so I went back to get the rest.
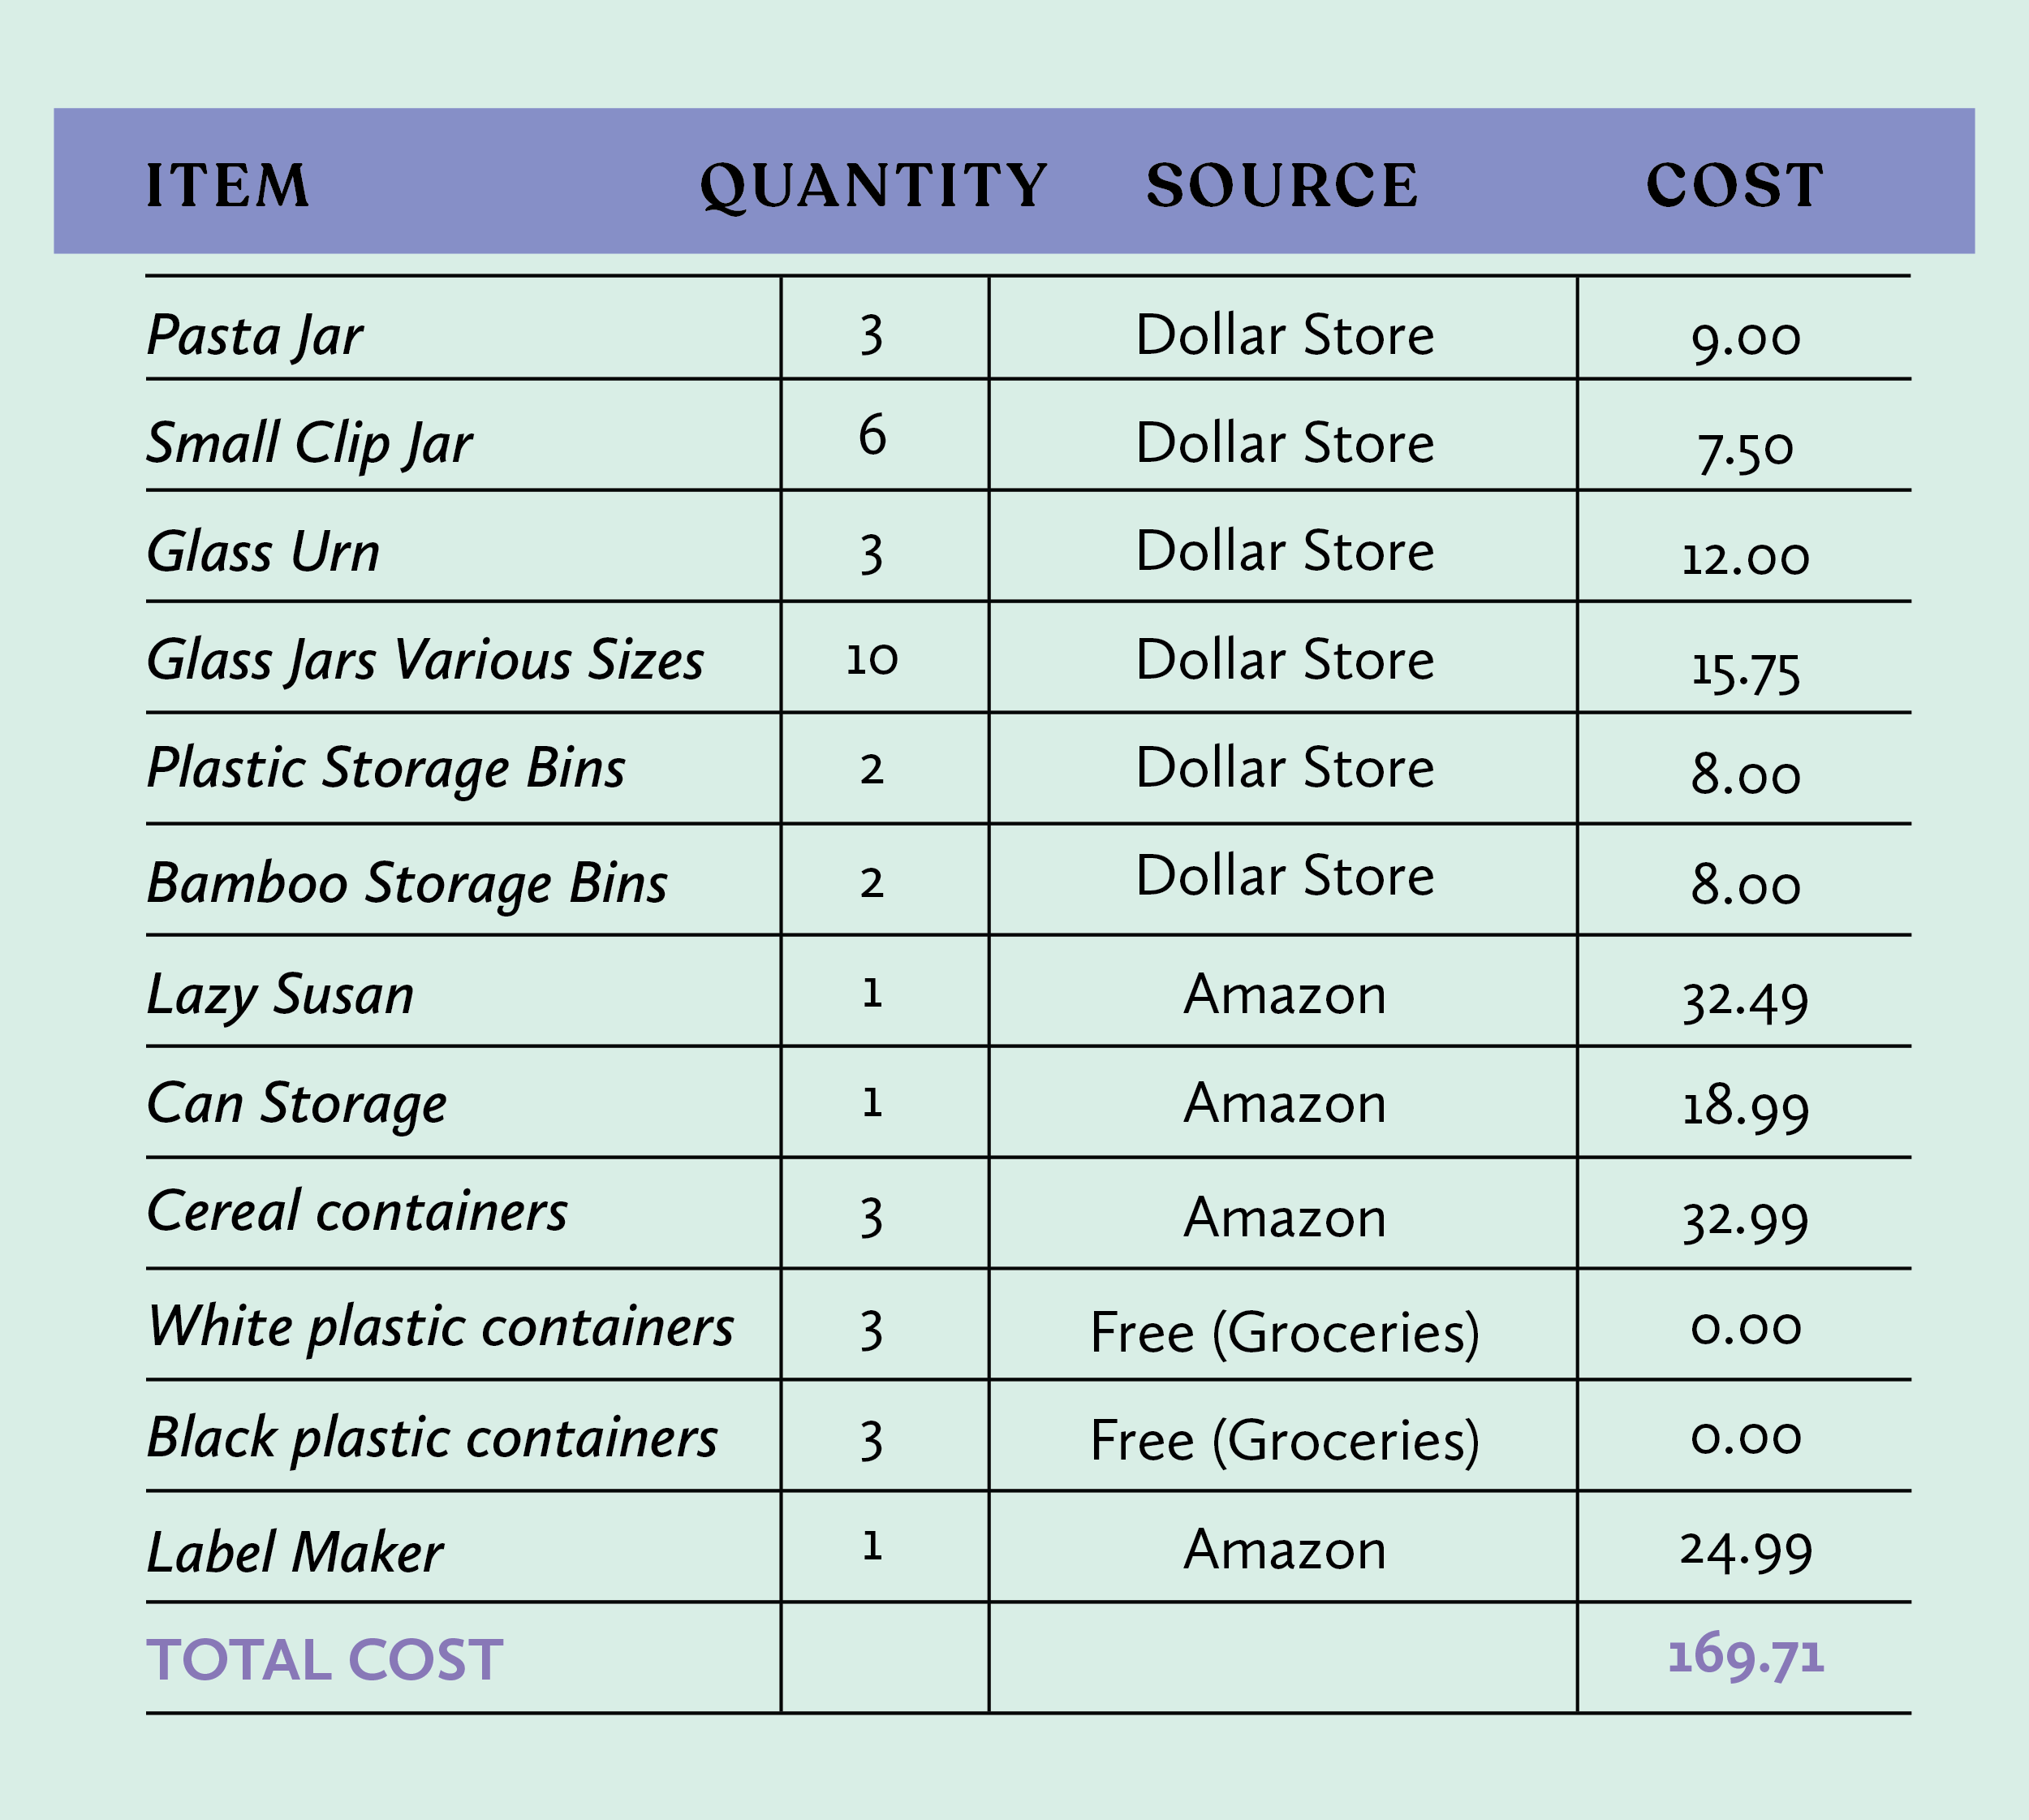
It took two trips to the dollar store, and a final purchase from Amazon to get items that I couldn’t find at the dollar store, like a can organizer and a label maker. Yes, I bought a label maker — it was only $25, and I knew it would get used multiple times as we start to organize every room in our home. Here’s a breakdown of what I spent, total:

I decided to put anything that I’d be able to purchase in bulk into glass jars or storage containers. Since I took an inventory of what I needed, I had the right amount of jars. But the hardest challenge was choosing which items would go into which size container. After a few switch-ups and moves, I found a good balance. Experiment with different containers and see what works best for your own pantry.
Step 6: Transfer your food items.
I wanted to overhaul my pantry to reduce food waste and create a more sustainable option for food storage. And it worked. With a designated spot for every pantry staple, I buy fewer packaged foods. I stopped buying items in boxes that weren’t easy to reuse or bags I couldn’t recycle. Instead, I take my Tupperware to bulk bin shops and transfer everything into my new containers. These changes not only make grocery-shopping more affordable, but they also create a better aesthetic and reduce food waste, which is a big win in my book.
*****
For me, there is nothing better than finishing up a long workday and coming home to a clutter-free space. It’s a great feeling to go into your pantry to cook a meal for your family, able to find everything you need in a stress-free environment.
I want my pantry to inspire me to be creative in the kitchen, and this experience has done precisely that. I’ve become more creative with my meals, and I’m more excited to cook them. Although I spent nearly $200 to organize and create the look and feel that I want, I can easily say this spring cleaning cost was well worth the expense.
Alyssa Davies claims she’s not an expert on personal finance — which is why it’s easy for her to explain financial topics without getting too intense. You can find her on her blog, Mixed Up Money, where she proves money isn’t boring (and that it’s also a little funny). You can also spend all day ranting with her about your finances on Twitter.
Image via Pexels
Like this story? Follow The Financial Diet on Facebook, Instagram, and Twitter for daily tips and inspiration, and sign up for our email newsletter here.


