Easy-As-Hell Home Décor: How To Make A Gallery Wall For $50 Less

Important preface: I love home décor and I’m really happy with where I’ve gotten my apartment, but I am by no means an expert. I’ve tried my hands at a few DIY projects, but none that required either a) a significant amount of indoor space, or b) power tools (besides using a drill to hang things). And I feel confident enough to consider myself proof that you can make your home feel like a reflection of yourself without a huge budget or awesome handyman skills.
When we moved about a year ago, I made it a point to have a plan in place for decorating before we even had our stuff packed. I knew I would keep putting it off if I didn’t get it over with in the first few weeks, and I’m so glad I did that. It’s made the space feel like home since basically the week we moved. (And yes, I share my apartment with my fiance, Peter, but I’m going to take full credit for the décor choices. Not to be too tradition-gender-roles about it, but he’s just happy it’s decorated, period.) My personal home pride and joy is in my living room, and it’s my hunter green-painted accent/gallery wall:
https://www.instagram.com/p/BiVR2XpnAf5/?utm_source=ig_share_sheet&igshid=kklm1rf01fql
How to build a gallery wall on a budget — for $50 or less
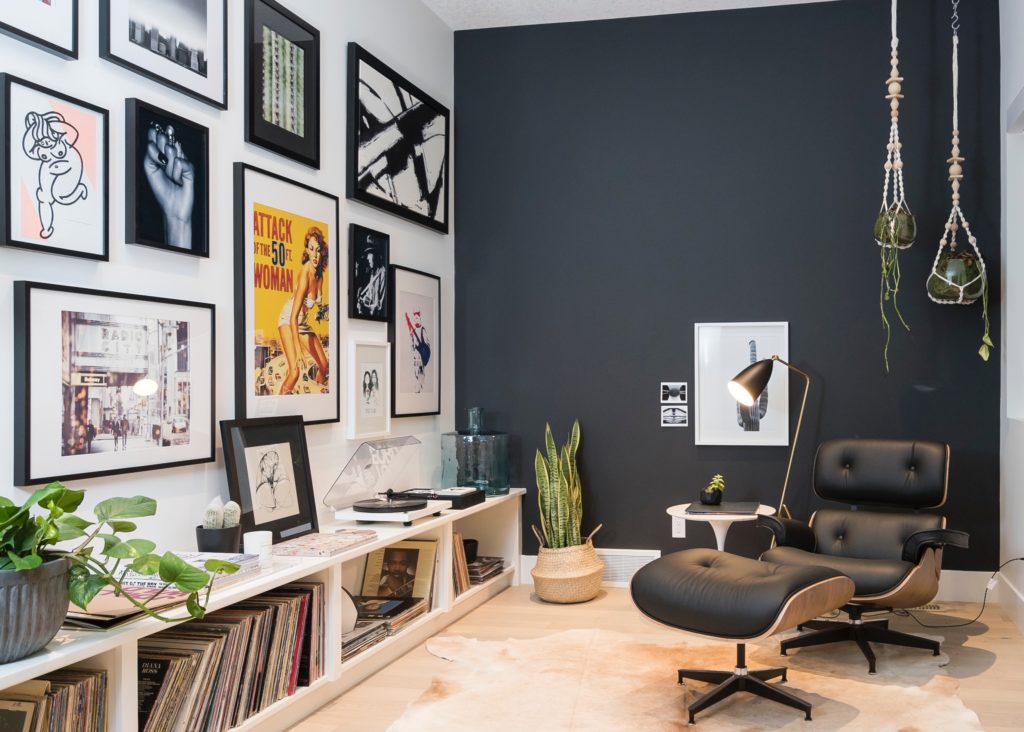
A gallery wall is, in my humble opinion, one of the absolute easiest ways you can make a room feel more “finished” without taking up all that much time, money, or effort. My own living room wall is made up of several different things — family photos, prints from friends, hand-me-down décor, a flea market find, and even framed photographs and bits of saved wrapping paper. It feels very mismatched, which I like, and the fact that it doesn’t take up the whole wall is great. I can just keep adding to it as I collect things! And while I’m not 100 percent sure about the total cost of my own wall’s décor (especially considering the items on it have been collected over several years), I’m certain anyone easily could put together a striking gallery wall for 50 bucks — if not much less. With the help of a few interior design experts, here’s how you can put together your own gallery wall that looks much more expensive than it is.
1. Pick your wall
First things first: choose the wall you want to decorate. I chose a wall that I had no other ideas for, and one where a shelving unit I’d need to reach often or another more “practical” piece wouldn’t have made much sense. Your own gallery wall may also go above a big piece of furniture like mine. You can also create a smaller gallery wall as a way to spruce up an otherwise awkward small wall space.
Your chosen wall will also help dictate the direction of your gallery wall. According to creative director Beverly Solomon, “When in doubt, go minimal. The less you put on your gallery wall, the more likely you are to get it right. However, I have visited Paris apartments where the wall space is all but totally covered with art, and somehow it still works.” I’m definitely more of a maximalist than a minimalist when it comes to décor, but keeping your project on the more minimal side is definitely a good way to keep costs down.
2. Decide on a “theme” (or decide you don’t want anything resembling a theme)
According to Solomon, ask yourself a few questions before settling on a strategy for your gallery wall. “What do you want your ‘gallery’ to accomplish? Are you looking for a pleasing way to fill a wall to compliment your other décor? Do you want your gallery to project something about you and your interests?”
For me, I just wanted a collection of images that reflected things my partner and I really like, that also work well together in the space. (This means it is mostly framed images of animals and food.) But you might want something more sophisticated, or something a lot simpler. Also, unless you want to go super eclectic, make sure the items you pick coordinate somewhat well with the rest of the room. “In general, if doing black & white photos, drawings, paintings or prints, stick to black & white on that wall,” Solomon explains. “When using colorful art, make choices that work with the colors of the walls and the other décor in that room.”
And remember that you definitely don’t have to stick with “flat” images on your gallery wall. “You can use more than framed art,” says Brianna Thomas, interior design blogger with Bloom in the Black. “Add shelves, lights, flat baskets, mirrors – the sky’s the limit! Shop your house, and you might be surprised at what you can use when you consider it in a new light.” From my experience, the key is not to overthink it. If something looks good to you, it’s working! It doesn’t matter what you decide to put on your wall as long as you think the items look good together, and you like looking at them.
3. Pick your images (as little as $0)
This is the fun part. If you want a gallery wall that’s simply full of family photos, you can easily order prints of photos online — I’ve ordered dozens of photo prints in different sizes from Snapfish, and it never costs me more than a few bucks. If you want a gallery wall full of framed artwork, it’s of course going to be a bit more challenging to keep costs down. One thing you could do is pick out one more expensive piece (relatively speaking) and go with found/free items for the rest of your wall. “I’ve found beautiful oil paintings for under $20 – you just have to dig and know that you can take off an ugly frame!” says Thomas. Secondhand stores may have exactly what you’re looking for.
You can also find a lot of inexpensive prints online. “There are thousands of talented artists selling their work online, often in the form of downloadable digital art,” Thomas explains. “You can have these masterpieces printed at your local office store or online at places like Shutterfly or Amazon. My favorite sources for downloadables are Etsy and Juniper Print Shop.” Prices definitely vary (which is important to remember when you’re supporting independent artists), but I’ve been able to find super cute downloadable prints on Etsy for as little as $5.
And remember, there are plenty of things you could frame that cost you zero dollars — often already lying around your home! “I have framed amazing shopping bags, posters, photos, magazine covers, 12-inch vinyl album covers, great fabrics, gift wrap paper, etc.,” says Solomon. I’m in the same boat — I’ve personally framed pieces of gift wrap (super helpful when your mom has excellent taste in wrapping paper), postcards, birthday cards, pages from magazines, old tickets, old calendar pages, and even some pieces of fabric. If you don’t have much in the way of paper products just lying around, ask friends. I promise at least one or two of them have been holding on to one too many Bon Appétits.
Also, keep the size of your wall in mind. You may want a mix and match of small and large pieces, but make sure you have the wall space for bigger items before you start purchasing them. And I would personally steer clear of having one huge piece surrounded by a dozen teeny-tiny frames – I’m sure someone with a more discerning design eye than me could make it work, but creating balance would be a lot tougher for us normies. If you’re going to have a mix of sizes, I’d recommend having the majority of your pieces be close-ish in size to each other, around the middle of your size range. But again, go with your gut — the only important thing is that it looks good to you.
4. Pick your frames ($5-40)
I have found that it is much easier to find free items to frame than it is to find free frames. But it’s at least very easy to find inexpensive frames! When picking your frames, decide how you want them to work with the images. You can either get a bunch in the same color to create more unity, or you can mix and match them for a more “collected over time” feeling. If you do want them all to look similar, you can get a set of them for $20-30 or individual frames for a few bucks each from places like Ikea. You can also peruse your local thrift store or Goodwill, where you can often find frames for as little as $0.50. Sometimes these look a bit worn, which you might like. But if you want your thrifted frames to look more uniform, you can just buy a can of white or black (or gold, or green, etc.) spray paint and go to town.
I like to go the route of framing free or super-cheap items in more interesting frames. I’ve found most of mine, in metallics/blacks/whites/interesting patterns, from HomeGoods, ranging from $6-12. And if you find a super elaborate frame you love, feel free to hang it all by itself — no art needed if the frame itself is really beautiful!
5. Lay out your framed items & start hanging (tools: $5-10)
Now, there are a couple of ways you could go about hanging. I personally believe in just eyeballing it. Lay everything out on the ground one way, snap a photo. Mix it all up, snap another photo, and so on. Look at all the photos on your phone, decide which one is your favorite, and start hanging them up! I like to keep bigger items as “anchor” pieces more towards the middle of the wall and balance them out with smaller and medium-sized pieces on the edges. But there’s really not a right or wrong way to arrange them — some people even prefer to keep everything a uniform size, which definitely makes it easier to choose a layout.
When hanging, you can use a hammer and nails, which can cost as little as $5 on Amazon or at your local hardware store. You can even get a pack of Command strips for $10 if you’re in a rental and don’t want to make any holes in the walls. (For what it’s worth, I am a renter and my walls are now super holey. I will be here for years, so I think it’s worth it. Plus, plastering is like the only fun part of moving.)
Of course, I am not a perfectionist — I don’t care if my items are perfectly evenly spaced. But you might! If that’s you, this is a great guide to hanging a gallery wall with all the tools you need to make it look as polished and professional as possible.
Remember: it’s not permanent
Even if you used a hammer and nails to hang all your pictures, you don’t have to be stuck with your gallery wall the way it is forever. If you decide to change up your gallery wall in the future, don’t worry too much about nail holes or bits of drywall tearing away. “Keep small jars — even a little plastic pill bottle will do — of the paint color of each wall,” says Solomon. “That way, if you have to patch a small hole where you hung a frame, it will match. If you did not keep the original color, you can buy a little set of acrylic paints for under $10 and mix your own match.”
A lot of people face “analysis paralysis” when it comes to doing any kind of decorating — it’s why Peter lived in his first NYC apartment for six months before he ever hung a single thing on the walls, and why it takes some people even longer. My personal philosophy is that having some sort of décor is way better than having nothing. I don’t 100% love every single thing about my apartment, as I anxiously await the day Peter is ready to part with his hand-me-down prints of dogs playing poker. But a decorated space is much more fun to come home to — even if it’s imperfect.
Holly is the Executive Editor of TheFinancialDiet.com. Follow her on Twitter here, or send her your ideas at holly@thefinancialdiet.com!
Image via Unsplash
Like this story? Follow The Financial Diet on Facebook, Instagram, and Twitter for daily tips and inspiration, and sign up for our email newsletter here.


